


If your MacBook refuses to boot (or is otherwise failing to work as it should), that doesn’t necessarily mean your files are gone. You may still be able to restore from a Time Machine backup or use a certified data recovery service.
The recovery options available to you depend on a few things: whether your MacBook still powers on, if your files were deleted or they’re just inaccessible, how its internal storage is designed, and whether encryption is a factor. Also, the recovery methods needed for older Intel-based MacBooks are very different from those needed for newer Apple silicon models.
Don’t repeatedly try to power it on. If your MacBook has suffered any kind of physical damage or hardware failure, it could worsen the issue. This extra damage will make your data harder to retrieve down the line.
In this guide, we’ll take a closer look at recovery options for dead MacBooks, water damage, SSD issues, deleted files, and when you should seek out professional data recovery.
Is It Possible to Recover Data from a MacBook?
The simple answer is yes — MacBook data can be recovered.
In reality, though, it isn’t always that simple. How you approach the recovery and your chances of successfully getting your data back depend on what actually went wrong. A MacBook that still powers on will usually offer you more recovery options than one with liquid damage, a failed logic board, or inaccessible internal storage.
Always start with the least invasive option. If your data isn’t backed up, it goes without saying: avoid erasing the disk, reinstalling macOS, or repeatedly attempting repairs before you understand the cause of failure.
Why Do MacBooks Lose Data?
MacBook data loss can happen for various reasons, from software issues to physical damage. Here are a few common causes:
- SSD or logic-board failure
- Corrupted system files
- Failed macOS updates
- Accidental deletion or formatting
- Impact damage
- Liquid damage
- Electrical faults or power problems
- Encryption or access issues
Depending on what caused your specific issue, you might see your MacBook repeatedly crash or fail to start up. In other cases, you may see a flashing question-mark folder, missing files, Disk Utility errors, or an internal drive that you can no longer seem to access.
For a deeper dive into all things related to MacBook crashes and how to approach them, check out our guide that takes a closer look at some common causes and recovery options.
How to Recover Data from a Dead MacBook
Before we get into how to go about recovering your data, it’s worth remembering that a “dead” MacBook can mean two very different things: either the hardware itself has failed, or your Mac still physically works, but the operating system won’t load.
If your MacBook has sustained obvious physical, liquid, or electrical damage, avoid repeatedly trying to turn it on. Our Mac data recovery experts can repair damage and retrieve lost data from the storage medium.
If the hardware seems fine, however, here are a few low-risk options to try first.
1. Check Your Backups
Before troubleshooting your Mac itself, check whether you already have the files you need elsewhere. This could be a recent Time Machine backup, files you’ve stored in iCloud Drive or iCloud Photos, or copies you’ve made on an external drive or a third-party cloud service.
2. Try macOS Recovery
If your MacBook still powers on, try starting macOS Recovery:
- Apple silicon: Shut down your Mac, then press and hold the power button until startup options appear.
- Intel Mac: Restart your computer while holding down Command-R.
From Recovery, you can access tools like Disk Utility, restore from Time Machine, or attempt other repairs.
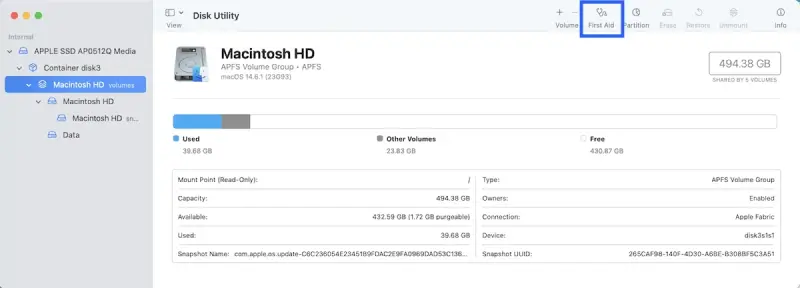
Using Disk Utility First Aid can help resolve certain logical or file-system-related problems. However, it’s important to remember to avoid repeatedly running repair tools if you believe your storage hardware may be physically failing.
3. Transfer Your Files to Another Mac
If your storage is still accessible, you may be able to copy your files directly over to another Mac. Apple silicon Macs can use Share Disk from macOS Recovery, and compatible Intel Macs can use the equivalent Target Disk Mode.
If none of these options work, or your MacBook won’t power on at all, professional diagnosis may be your safest next step.
How to Recover Data from a Water-Damaged MacBook
If you’ve had a liquid-spill incident with your MacBook, or if it has otherwise been exposed to liquid, prioritize protecting your data first. Start by immediately shutting down your MacBook, then disconnect the charger and any accessories.
Do not repeatedly turn it off and on to test whether it still works, and don’t charge it while there may still be moisture inside.
A lot of advice found online can be misleading, and in some cases, harmful. Here are two such common DIY mistakes to avoid:
- Do not use rice.
- Do not use a hair dryer, an oven, or other direct heat.
Both these methods can spread residue, force moisture deeper into the device, or even create additional damage. Liquid exposure can lead to short circuits, corrosion, damaged connections, and logic-board failures. And even if the outside of your laptop seems to be dry, those problems may still be present inside.
If you’re dealing with a water-damaged MacBook, check out our detailed guides on how best to approach the issue — both for MacBooks in particular, and for all devices in general.
How to Recover Deleted Files from a MacBook
If your MacBook still works, but you’ve accidentally deleted a file that you need to get back, start with the simplest recovery options before trying anything more involved or risky:
- Check the Trash. If you haven’t emptied it, you may be able to restore the file immediately.
- Check Time Machine. If you have a suitable backup, Time Machine can restore deleted files or previous versions. Backed-up items can be restored to their original location.
- Check iCloud Drive, iCloud Photos, or another cloud backup. If you keep regular cloud backups, your file may still exist online even if it is no longer stored locally.
- If you don’t have a suitable backup and the file was deleted from the internal SSD, use your Mac as little as possible to preserve the best chance of recovering your file.
The last step is crucial because modern SSDs use technologies such as TRIM and garbage collection. When macOS marks deleted storage blocks as no longer needed, the SSD may clear or reuse those blocks. And once that happens, traditional methods to “undelete” files become a lot more complex.
APFS, encryption, TRIM, and continued writes can all potentially affect your chance of recovery. Unfortunately, it’s difficult to say with certainty whether your deleted SSD data can or can’t be recovered — but the sooner you stop writing new data, the better your recovery prospects may be.
How to Recover Data Directly from a MacBook SSD
If recovery through macOS, Time Machine, or cloud backups isn’t possible, the next step may be to try to access your MacBook’s internal SSD directly. This method is best suited for older MacBook models, which may use conventional, removable storage.
In short, if you’re comfortable doing so, here’s how you can recover data directly from your MacBook’s SSD (for older MacBook models with removable storage):
- Confirm that your MacBook model has removable storage and power the device down completely.
- Open up your MacBook, remove the drive and connect it to another computer using a compatible adapter or enclosure.
- If the drive mounts successfully, copy the files you need to another storage device.
Newer models, on the other hand, often integrate flash storage more closely with the logic board. On Macs with Apple silicon or the T2 Security Chip, internal storage is also protected by hardware-backed encryption tied to the Secure Enclave. This cryptographically binds the file system to its original device, meaning simply removing the storage and connecting it to another computer is often not a viable recovery method.
In simple terms, this means that this recovery method is much more complex for these devices. The good news is that recovery isn’t necessarily impossible, but may require specific tools and expertise, such as board-level diagnostics, SSD/NAND knowledge, access to the original hardware, and valid credentials where encryption is involved.
We can help. At Secure Data Recovery, we work with older and newer Mac models, including SSDs, APFS and HFS+ file systems, logical failures, and physically damaged devices.
Our team includes Apple Certified Mac Technicians and we’re an Apple Authorized Service Provider, so you can rest assured: your data and device are in good hands.
When to Stop DIY MacBook Data Recovery

For simple software or backup-related issues, DIY recovery makes sense. However, there are certain situations where continuing to attempt these methods can do more harm than good.
Stop troubleshooting if:
- Your MacBook has suffered water, impact, or electrical damage
- It refuses to turn on at all
- The internal storage repeatedly disappears
- Disk Utility reports serious or unrepairable errors
- The MacBook repeatedly freezes or crashes during file transfers
- The files are irreplaceable and you do not have a backup
- macOS prompts you to erase, initialize, or reformat the storage
Be especially cautious with options like Erase Mac, Erase All Content and Settings, or any reinstall processes that require you to wipe your disk. If your priority is recovering files that you haven’t backed up, do not proceed with these steps; they will make recovery much more difficult.
If the problem is deeper than a simple software issue, professional recovery is usually the safest option.
How to Protect Your MacBook Data in the Future
A recovery plan may seem like a hassle to set up, partly because we all hope we’ll never need it. But you never know when data loss might strike, not having a recovery plan to fall back on can be a crisis.
Start by setting up Time Machine with an external drive, then use iCloud or another cloud service for an additional copy of your most important files.
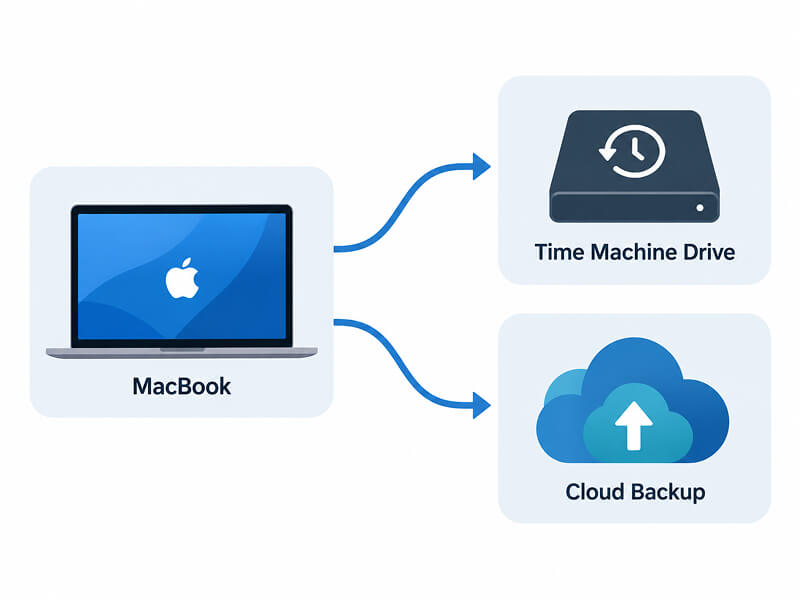
For valuable work or other irreplaceable data, follow the 3-2-1 backup rule: keep three copies of your data, on two different types of storage, with one copy stored off-site.
Here are a few other habits that can help:
- Keep your macOS up to date
- Store your most important files in multiple locations
- Keep your FileVault password and recovery information somewhere safe
- Open files from your backups from time to time to make sure they’re still accessible and working as intended
Your MacBook should never be the only place where you store your most valuable files.
Contact Apple-Certified Mac Technicians to Recover Your Data
When DIY recovery is no longer safe or practical, Secure Data Recovery can help. Our nationwide Mac recovery service includes Apple Certified Mac Technicians (ACMTs) and Apple Authorized Service Provider status, and we offer support for MacBook Air, MacBook Pro, and older Mac models.
Our specialists work with APFS, HFS+, SSDs, and older HDD-based Macs, including cases involving logical corruption, physical damage, liquid exposure, electrical faults, and inaccessible storage.
Working with us is easy: we provide a free diagnostic and a No Data, No Recovery Fee guarantee. We won’t charge you unless we’re able to recover your data.
Remember, repair and data recovery aren’t the same thing. If recovering your files matters more to you than getting your MacBook working again, make sure you let us know before authorizing any repair, replacement, erase, or reinstall procedures.
Our support team is available 24/7. To get started, give us a call at 0800-102-6925 or start your case online today!


