


The Unmountable Boot Volume stop code is a Blue Screen of Death (BSOD) error that prevents Windows from loading properly.
When the stop code UNMOUNTABLE_BOOT_VOLUME appears, it means your system can’t access the partition where Windows is installed. As a result, you are locked out of your desktop or laptop and unable to reach your files.
This issue can occur on Windows 10, Windows 11, and even older systems like Windows 7. Typically, it’s caused by file system corruption, hard drive errors, or problems with essential boot components such as a damaged Master Boot Record (MBR) or misconfigured UEFI settings. In many cases, it appears after a failed Windows update, an abrupt shutdown, or early signs of hardware failure.
While tools like CHKDSK or bootrec can sometimes repair the problem, they can also make data loss worse if the drive is unstable. That’s why it’s important to approach the fix carefully.
In this guide, the experts at Secure Data Recovery will walk you through how to resolve the error step-by-step, while taking measures to keep your data safe.
What Is Unmountable_Boot_Volume?
The Unmountable Boot Volume error can stem from a wide range of software and hardware issues. While the symptoms often look the same (typically, a BSOD or your computer failing to start), the underlying causes can vary, and before you can apply the right fix, you need to identify what caused the problem.
In this section, we’ll break down some of the most common causes of the Unmountable Boot Volume error.
Software-Related Causes
- Corrupted file system: Often follows an abrupt shutdown, power loss, or system crash. Windows may freeze during boot or show a BSOD soon after startup.
- Interrupted or failed Windows update: Reboot loops, crashes right after updating, or incomplete patch installations can break essential boot files.
- Damaged boot configuration (MBR, boot sector, or BCD): You may see errors like “bootmgr is missing” or “operating system not found”. This often happens after cloning a drive or using disk management tools.
- Driver conflicts or bad software installs: If Safe Mode works but normal boot doesn’t, a newly installed driver or app is often the culprit.
- Malware affecting boot files: Certain malware strains corrupt system files or the boot sector, making Windows unbootable.
Hardware-Related Causes
- Failing hard drive or SSD: Clicking noises, sluggish behaviour, or inconsistent detection in BIOS suggest physical failure.
- Loose or damaged drive cables: Intermittent detection, BIOS not seeing the drive, or spontaneous reboot loops may point to a simple but critical connection issue.
- Recent BIOS or hardware changes: After upgrades or BIOS updates, the boot order may be incorrect, causing Windows to load from the wrong device.
- Disk cloning or partition errors: Improperly resized partitions or incomplete cloning can break Windows’ ability to find the system volume.
- Physical disk damage: Drives that freeze BIOS, click loudly, or fail to spin up typically require professional recovery.
Why Identifying the Cause Matters
Attempting the wrong fix can worsen the corruption on your drive, and running tools like CHKDSK on a failing drive can even destroy recoverable data. Understanding the root causes helps you choose safe troubleshooting steps and know when it’s time to request help for SSD or hard drive recovery.
How To Fix Unmountable Boot Volume Error
In this section, we’ll go over 8 simple DIY fixes that could resolve your Unmountable Boot Volume error. We’ll start with the least invasive fix, so go through the steps in order.
If at any point you suspect the drive is failing — for instance, you hear clicking noises, your BIOS freezes, or your drive disappears — stop immediately and skip to the professional help section.
Before Starting: Take Steps To Protect Your Data
Before attempting any repairs, it’s important to approach the unmountable boot volume error carefully. Tools like CHKDSK, bootrec, and even Windows’ inbuilt repair utilities can fix certain issues; however, if your drive is unstable, the same tools can even make the problem worse.
A failing hard drive or SSD might degrade rapidly under stress, and running repair commands can overwrite damaged sectors and permanently destroy recoverable data.
That's why the safest first step is to avoid writing anything to the affected disk.
If possible, create a disk image using a separate computer or recovery environment. If you hear unusual noises from the drive, notice BIOS detection issues, or store irreplaceable files on the system, stop here and consider data recovery services.
Taking the right precautions early on gives you the best chance of fixing the error without losing your data.
1. Run Automatic Repair
This inbuilt Windows tool can often resolve minor corruption caused by an interrupted update or improper shutdown.
To run Startup Repair:
- On a working PC, download the Windows Media Creation Tool from Microsoft and create a bootable USB.
- Insert the USB into the affected computer and boot from it.
- When the installer loads, select Repair your computer.
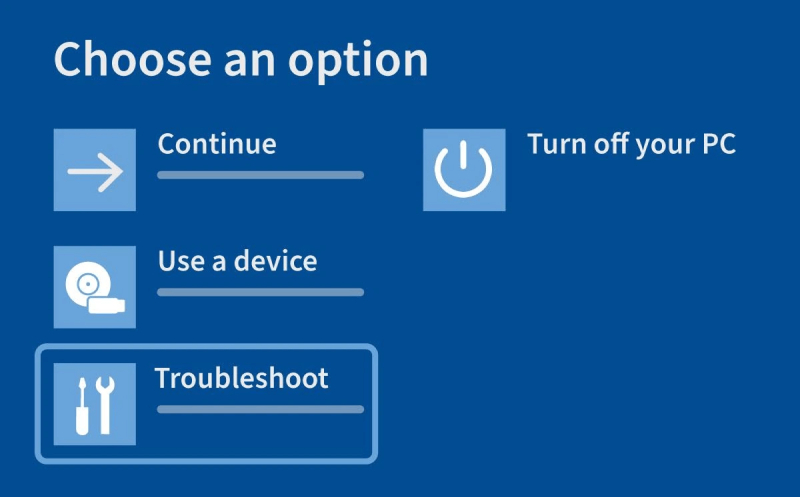
- Go to Troubleshoot > Advanced options > Startup Repair.
- Choose your Windows installation and let the tool run.
If it completes successfully, your system will reboot normally. Otherwise, move on to the next method.
2. Check BIOS Settings and Boot Order
A misconfigured boot order can cause Windows to fail to load. Typically, this happens after BIOS updates or hardware changes.
To check your boot order in the BIOS settings:
- Restart the PC and press DEL, F2, F10, or ESC to enter BIOS/UEFI.
- Find the Boot Order / Boot Priority menu.
- Ensure your main system drive is listed first.
- Save changes and restart.
If the boot drive is missing entirely, this may signal a hardware problem that requires professional evaluation.
3. Boot into Safe Mode and Remove Problem Updates
Driver conflicts, faulty Windows updates, or buggy software installs can all trigger this error. Safe Mode loads only essential drivers so you can remove the problematic update.
To enter Safe Mode:
- Boot from the USB installation drive.
- Select Repair your computer > Troubleshoot > Startup Settings > Restart.
- Press F4 for Safe Mode or F5 for Safe Mode with Networking.
Once you’re in:
- Open Settings > Windows Update > Update history, or
- Use Device Manager to remove recently installed drivers.
Restart your computer normally to test whether this fix worked.
4. Use System Restore
If you first encountered the Unmountable Boot Volume error after a system change, update, or installation, System Restore can roll your PC back to an earlier stable state without deleting personal files.
To use System Restore:
- Boot from the USB drive.
- Select Repair your computer > Troubleshoot > System Restore.
- Choose a restore point from before you first encountered the error.
- Let the process finish and restart.
If no restore points are available, move on to system file repair.
5. Repair Missing or Corrupted System Files (SFC Scan)
If Windows isn’t able to load necessary components, the System File Checker (SFC) tool can replace corrupted or missing system files with clean versions.
To run SFC:
- Boot from your USB drive.
- Go to Repair your computer > Troubleshoot > Command Prompt.
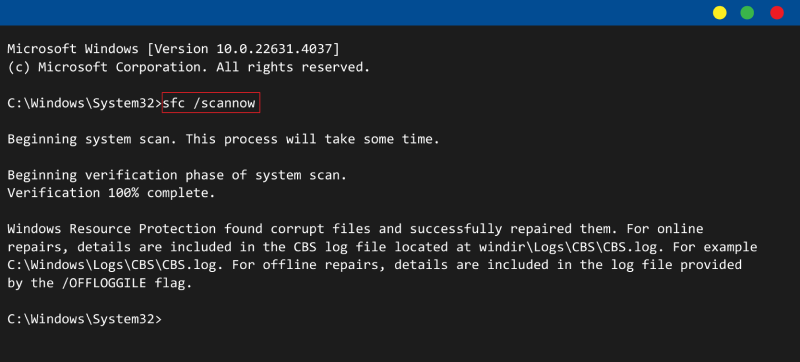
- Type: sfc /scannow
- Press Enter and let it complete.
If SFC reports it couldn’t fix everything, proceed to the next step.
6. Scan your Drive with CHKDSK
The CHKDSK tool checks your drive for file system errors and attempts repairs.
To run CHKDSK:
- Boot from your USB drive.
- Go to Repair your computer > Troubleshoot > Command Prompt.

- Type: chkdsk C: /f /r
(Replace C: with the correct drive letter if it’s different in your case)
- Press Enter and let it complete.
This process can take a while. If your drive is healthy but Windows still isn’t able to boot, move on to the next step.
CAUTION: If your drive is physically failing, running CHKDSK can make the damage worse. If you hear any clicking or grinding, or if the drive intermittently disappears, stop the process immediately.
7. Rebuild Boot Configuration Files (MBR/BCD Repair)
Corrupted boot files can prevent Windows from locating, and being able to successfully load your operating system. The Master Boot Record (MBD) and Boot Configuration Data (BCD) tools can sometimes rebuild and repair these files.
To repair the bootloader:
- Boot from your USB drive > Repair your computer > Command Prompt.
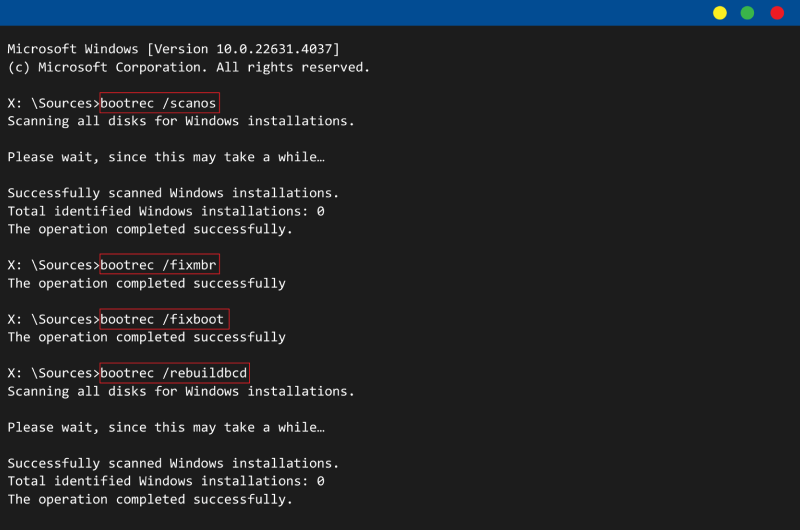
- Run the following commands one at a time:
- bootrec /scanos
- bootrec /fixmbr
- bootrec /fixboot
- bootrec /rebuildbcd
If these commands fail or report “Access Denied”, the problem may be deeper, and you may need to seek professional help.
8. Reset This PC (Optional Last-Resort Software Fix)
If your drive appears to be physically healthy, but contains severe file corruption, a system reset may allow Windows to reload properly.
To reset your PC:
- Boot from your USB drive.
- Go to Repair your computer > Troubleshoot > Reset this PC.
- Choose Keep my files.
If the reset fails, or your drive starts to behave erratically, your issue is likely to be hardware-related, and your best bet is to seek professional assistance.
Unmountable Boot Volume: When To Seek Help
If you’ve worked through the repair steps and your system still won’t boot, it’s important to pause. Continuing to run tools like CHKDSK, SFC, or bootrec on an unstable drive can make the situation significantly worse — and in some cases, cause you to permanently lose data.
Stop troubleshooting immediately if you notice any of the following:
- Clicking, grinding, or buzzing sounds
- Drive disappearing from BIOS or Windows Setup
- Extreme slowness or freezing during scans
- Repeated BSODs during startup
- CHKDSK failing instantly or freezing the system
These are strong signs that your drive is physically failing or has sustained severe corruption. Every additional repair attempt risks overwriting recoverable data.
At this stage, your best next step is to consult a professional data recovery service. Secure Data Recovery offers certified cleanroom facilities, advanced diagnostic tools, and a No Data, No Recovery Fee guarantee. Your data will always be handled safely, and we’ll never charge you if we can’t recover your files.
Call 0800 102 6925 or contact us today if you’re dealing with an Unmountable Boot Volume error, or any other type of data loss. You will receive a free diagnostic as part of our standard service. We’re here to help you get your data back.


