


There aren’t many things that can stop you in your tracks the way that suddenly losing access to your data does. Whether you’re dealing with a failed hard drive, a corrupted file, or an accidental deletion, it can be overwhelming to lose access to your important files. And when you’re not sure what caused it, it can be that little bit more stressful.
The good news is that your data isn’t gone for good. However, the steps you take soon after you discover that your data is inaccessible are crucial. In the panic of the moment, a few hasty mistakes can be the difference between recovering your files and permanently losing them.
In this post, we’ll walk you through five things you should absolutely avoid doing after a data loss event. From avoiding dangerous “quick fixes” to knowing when to seek professional help, our tips will help you prevent further damage, protect your data, and guide you toward recovery.
Let’s get into it.
1. Don’t Panic and Rush Into Quick Fixes
When you first realize that your important files have vanished or that you cannot open them, it’s easy to go into crisis mode. Our first instinct is often to look for a quick fix to try and undo the damage as quickly as possible. Unfortunately, some of the most common “quick fixes” can actually reduce your chance of successfully recovering your files. Sure, they do sometimes work—but you’re better off going with a solution that works reliably.
Here are a few panic-driven actions that can often do more harm than good:
- Constantly restarting your computer: Rebooting your computer repeatedly can trigger system processes that overwrite deleted data or worsen existing corruption. It’s vital to avoid restarting more than once.
- Downloading and installing free, unverified recovery tools: These programs may write to your affected drive during their installation, and can potentially overwrite the data you’re trying to recover.
- Running disk cleanup utilities: Windows Disk Cleanup, or third-party system optimizers, may sometimes permanently delete temporary files and “unused” data, some of which may be essential for recovering your files.
- Attempting to reformat the drive: Formatting—even a “quick” format—can make recovery far more difficult, as it alters the drive’s file structure.
If you can, try to recall what happened before your data loss issue occurred. Did you experience a failed transfer or install a Windows update? Or could you have accidentally deleted a file from the wrong folder? Taking stock of what happened can help guide your next steps and will be important if you need professional assistance later on.
Staying calm and taking a cautious approach in the first few moments is how you can maximize your chance of recovery. It’s tempting to act fast and hope for a quick fix, but you’re better off taking the safe route.
2. Don’t Keep Using the Affected Device
After finding out that you’ve experienced data loss, your first instinct might be to keep using the device, or to try and look for a quick fix, especially if everything else seems to be working as normal. But continuing to use the drive where the data loss took place can often reduce your chances of recovery.
This happens because when a file is deleted or lost, it’s not entirely erased. The space on your drive that it lived in is marked as “available,” and contains remnants that can be used to recover your file. That is, until some new file takes that space: be it a new app you install, a photo, or even temporary system files.
Here are a few things you should avoid doing on your affected drive:
- Saving or creating new files
- Installing recovery software onto the same drive
- Running updates or disk cleanup utilities
Instead, these are a few ways to improve your chances of a successful recovery:
- Stop using the affected drive immediately. If it’s an external drive, power it down or safely eject it from your computer

- Use a different computer to run any recovery tools on the affected external hard drive
- Install any recovery tools on an entirely different drive rather than one you’re trying to recover data from.
The sooner you power down and take your affected drive offline, the better your chances of restoring your files fully intact.
3. Don’t Attempt to Recover Your Files Without Understanding the Risks
It’s easier than ever to find and download DIY recovery software online. When you’ve lost access to your data, it’s tempting to download the first free recovery tool you find, and hope that it solves your problem. But remember: not all tools are created equal, and the wrong one may actually worsen your chance of a successful recovery.
Many lower-quality recovery programs don’t just scan your drive, but they also write to it during installation or recovery. This means, quite literally, just using the tool can overwrite the data you’re trying to recover, and make you lose it for good. In other cases, these tools may partially recover your file, or recover a corrupted or unusable version of your file. All in all, it’s best to avoid recovery programs that you don’t know for sure are trustworthy.
Here are a few common mistakes that you can easily avoid:
- Installing recovery software on the same drive that your lost data was on
- Using tools that don’t show you a preview of your recoverable files
- Following outdated or unverified advice from the internet
DIY recovery can absolutely work—but you’ll need to navigate it carefully. Typically, it’s safe to try if your data loss was recent, your drive is physically in good shape, and no new data has been written. Still, only use trusted, read-only software, such as SecureRecovery Undelete, and make sure to install it on a separate drive.
If your situation involves physical drive failure, strange clicking noises from your hard drive, or repeated system crashes, it’s best to avoid the DIY recovery route entirely. In these cases, you’re better off seeking professional help from a specialist like Secure Data Recovery. We can help you get your data back while minimizing the risk of permanent data loss.
4. Don’t Ignore the Root Cause of the Data Loss
While you’re recovering your files, or once you’ve successfully recovered them, it’s important to reflect on what caused your data loss in the first place.
It’s easy to focus entirely on getting your files back and move on without worrying about what actually went wrong. However, ignoring the root cause means that you may find yourself in the same predicament again, perhaps even a more severe version of it.
Here are a few of the more common causes of data loss:
- Failing hard drives or SSDs
- Interrupted software updates or data transfers
- Malware infections
- Accidental formatting or deletion
- Power loss or hardware malfunction
Take the time to retrace your steps leading up to the data loss. Did your system recently crash, perform an update, or show any strange signs such as intermittent freezing? Did your hard drive start making clicking noises? Was your antivirus software (or built-in scanner such as Windows Defender) disabled?
Consider running a drive health check (see below for a quick guide on how to do so), reviewing system logs (using Windows Event Viewer or a similar tool) and running a malware scan with your antivirus software or Windows Defender.
This can give you some insight into whether the issue was a one-off or whether you have a more persistent problem on your hands. If your issue was hardware-related, continuing to use the same drive could lead to data loss again in the future, or worse, permanent damage.
To run a quick check for errors on your hard drive in Windows, follow the steps below:
- Open the Run dialog box by pressing Windows + R, then type “diskmgmt.msc” and press Enter.
- In the Disk Management window, right-click on your affected drive and select Properties.
- Navigate to the Tools tab.
- Under the Error checking section, click on the Check button.
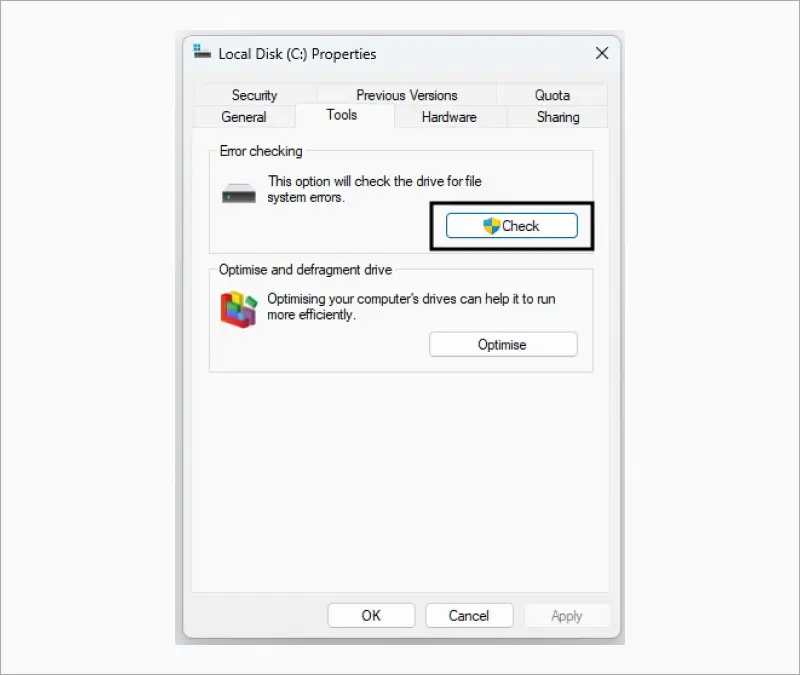
If the scan finds errors, you may have just found a possible cause of your data loss situation.
By identifying the cause, you can reduce the risk that this incident happens again and also be better prepared to choose the right recovery strategy going forward.
5. Don’t Put Off Taking Preventative Action
Recovering your files is only half the battle. Once you’ve got your files back, it’s easy to forget the whole thing even happened and move on. You may end up dealing with data loss again in the future, though, so taking preventative action can save you a lot of stress.
Here are a few simple but effective preventative measures that can save you a lot of trouble in the future.
- Set up regular backups
Set up Windows File History or Backup and Restore (Windows 7) to back up your files regularly and automatically. For an extra layer of protection, keep one local backup and one on either an external hard drive (ideally an encrypted one like SecureDrive) or a cloud-based service.
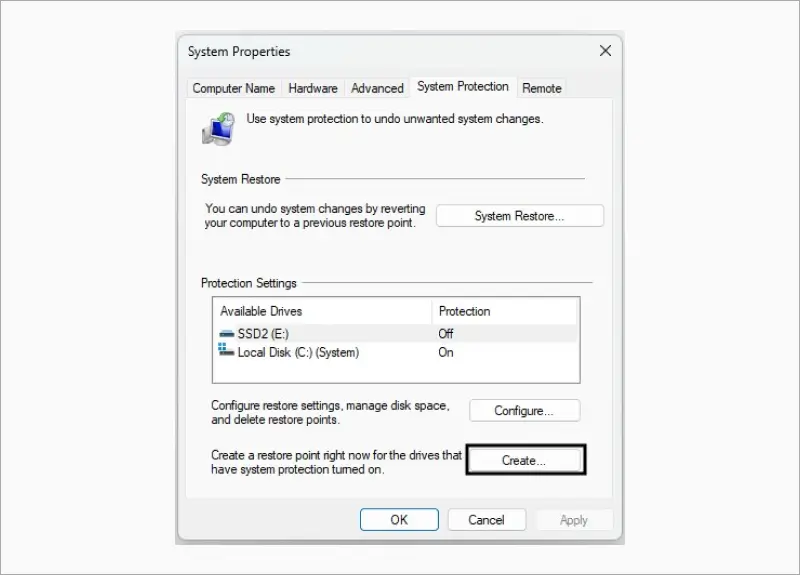
- Create system restore points
Make sure your System Restore is set to automatically create a restore point before major Windows updates. Additionally, consider manually creating restore points before installing any new apps or doing any major file transfers. To do this, type “Create a restore point” into your Windows search bar, then select Create near the bottom of the window.
- Regularly check your drive’s health and scan for viruses
Data corruption and loss are often caused by drive errors and viruses, so staying on top of both these things can go a long way. Regularly run tools like CHKDSK and the Windows error checking tool to make sure your hard drive is in good health. Similarly, to make sure your computer is free of malware, frequently update your antivirus and run regular scans.
By putting even a few of these protective measures in place, you’ll dramatically reduce the chance that you face another data loss event. And if you do, you’ll have no reason to panic, with recent backups ready to go.
Need Help Recovering Your Data?
If you’re dealing with data loss and aren’t sure what to do next, or if the steps you’ve taken haven’t been successful, don’t risk making things worse.
At Secure Data Recovery, we specialize in safely retrieving lost, damaged, or corrupted files from all types of storage devices. Whatever form of data loss you’re dealing with, we’re here to help.
Don’t let a small mistake turn into permanent data loss. Contact us today for a free consultation and take the first step toward getting your data back!


